The single most avoidable engine repair in BC boating is the damage that comes from skipping winterization. Water left in the cooling system freezes, expands, and can crack the powerhead casting, a failure that often costs more than the engine itself. Untreated fuel gums up injectors and carburetors over the off-season. Gear lube contaminated with water destroys bearings. A few hours of proper preparation in October prevents all of this, and it gives you a boat that starts cleanly in spring rather than one that needs a shop visit before it can go back in the water. This guide walks through every step of how to winterize an outboard motor correctly, covering both Mercury and Yamaha engines and explaining the differences between two-stroke and four-stroke procedures where they matter.
Why Skipping Winterization Can Get Expensive?
The cost of a properly done winterization in parts and time is under a hundred dollars and a couple of hours. The cost of skipping it ranges from a few hundred dollars for a clogged carburetor to several thousand for a cracked block or scored cylinders. BC winters are mild by national standards, but a single hard frost is enough to cause freeze damage in a cooling system that still has water sitting in it. Even without a freeze, old engine oil sitting in a four-stroke crankcase all winter carries combustion acids that slowly etch bearing surfaces. Fuel left untreated in the tank and fuel lines for three or four months begins breaking down, forming varnish deposits that restrict flow and cause starting problems the following spring.
What to Prepare Before Winterizing Your Outboard
Lay everything out before you begin. The job moves much faster when you are not stopping to find a missing wrench or driving to the parts store mid-task.
| ITEM | NOTES |
| Fuel Stabilizer | Marine-specific formula. Mercury Quickstor or Yamaha Fuel Stabilizer are the right choices for their respective engines. |
| Flushing Muffs | Earmuff-style attachments that connect to a garden hose and seal over the lower unit water intakes. Required for flushing the motor on land. |
| Freshwater Hose | Long enough to reach from an outdoor tap to the motor. A standard garden hose works fine. |
| Fogging Oil | Corrosion-inhibiting oil is sprayed into the cylinders before storage. Mercury Storage Seal or Yamaha equivalent. Two-stroke DFI engines like Mercury OptiMax use a different procedure. |
| Lower Unit Gear Lube | OEM-specified gear lube for your motor. Comes with a pump tube for filling from the bottom. |
| Engine Oil & Filter (4-Stroke Engines Only) | Use the weight specified in your owner’s manual, typically 10W-30 or 10W-40 marine-grade. |
| Marine Grease | For greasing steering pivots, tilt tube, throttle linkages, and propeller shaft. |
| Corrosion Inhibitor Spray | Applied to exposed metal surfaces and the powerhead after fogging. |
| Spark Plug & Anti-Sieze Compounds | Check your service schedule. If they are due, replace now rather than in spring. Apply anti-seize to threads before reinstalling. |
| Basic Hand Tools | Socket set, screwdrivers, and oil drain pan. The gear lube pump typically comes with the lube bottle. |
How to Winterize an Outboard Motor: Step by Step
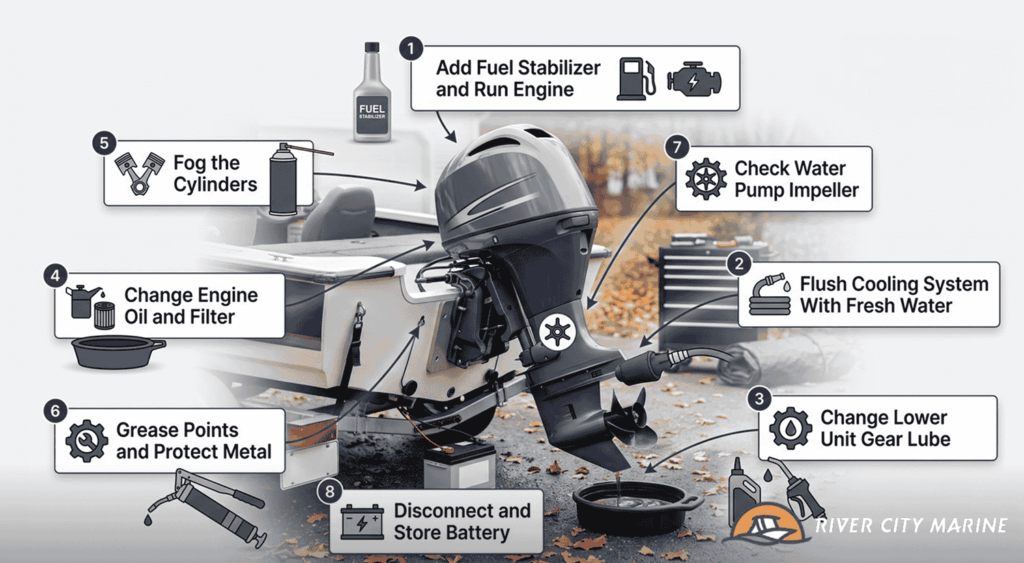
Step 1: Add Fuel Stabilizer and Run the Engine
Fuel is the first thing to address, and doing it right means the treated fuel reaches every part of the fuel system, not just the tank. Add the correct dose of marine fuel stabilizer to a full tank of fresh fuel. A full tank prevents condensation from forming inside the tank over winter, which introduces water into the fuel. The standard dosage for Mercury Quickstor is one ounce per five gallons. Yamaha Fuel Stabilizer runs at one ounce per ten gallons. Check the label on whatever product you are using since the dosage varies between brands.
After adding the stabilizer, run the engine for 10 to 15 minutes on muffs connected to a freshwater garden hose to circulate the treated fuel through the entire system. This is not optional. A stabilizer sitting in a tank is doing almost nothing until it has moved through the fuel lines, the fuel pump, and the injectors or carburetor. For carbureted two-stroke engines, shut the fuel valve off during this run and let the engine run until it stalls, which empties the carburetor bowls completely. Replace the fuel filter before finishing this step.
Step 2: Flush the Cooling System With Fresh Water
BC boats cover a range of water types across a season. Aluminum river boats running the Fraser River pick up silt and sediment in the cooling passages. Fiberglass boats running coastal routes accumulate salt. Both cause internal corrosion over the off-season if not flushed out before storage. Connect flushing muffs to the lower unit water intakes, hook up the freshwater hose, and run the engine at idle for a minimum of 10 minutes. The tell-tale stream coming from the engine should be a steady flow throughout the run. A weak stream or no stream at all is a sign of a cooling system problem worth diagnosing now rather than discovering in spring.
If your boat has been running in saltwater regularly, warm water flushes more effectively than cold water and does a better job of dissolving salt deposits. This step is the most straightforward part of the whole process and also one of the most neglected.
Step 3: Change the Lower Unit Gear Lube
Lower unit gear lube should be changed every season or every 100 hours, whichever comes first. Old gear lube breaks down over time and can become contaminated with water through worn seals. Water in the gear lube freezes in cold temperatures, expanding against the lower unit housing and causing cracks. The condition of the old lube also tells you something useful about the health of the lower unit seals. Place a drain pan under the motor and remove both the drain screw at the bottom and the vent screw above it. Let the old fluid drain completely before inspecting its colour and consistency. Milky or grey lube indicates water intrusion through a failed seal, which needs to be fixed before the motor goes back in the water in spring.
Fill the lower unit from the bottom by pumping fresh lube into the drain hole until it flows steadily from the vent hole at the top. Install the vent screw first with a new gasket, then remove the pump and install the drain screw quickly to avoid spilling. Using new screws with fresh gaskets both times is worth the small cost to ensure a watertight seal over winter.
Step 4: Change the Engine Oil and Filter (Four-Stroke Engines Only)
This step applies to four-stroke Mercury and Yamaha outboards. Two-stroke engines do not have a separate crankcase oil system. Old crankcase oil carries combustion by-products, including acids that actively corrode internal engine components when left sitting over an extended storage period. Changing it while the engine is still warm from the flush step allows the oil to flow freely and carry more contaminants out with it. Drain the old oil completely, replace the oil filter with a genuine OEM unit, and refill with fresh marine-grade oil of the weight specified in your owner’s manual, typically 10W-30 or 10W-40. Run the engine briefly on muffs after the oil change to circulate the fresh oil and confirm there are no leaks from the filter or drain plug.
Step 5: Fog the Cylinders
Fogging is the process of coating the cylinder walls, piston rings, and valve surfaces with a light protective oil before storage. Without it, these metal surfaces are exposed to moisture over the off-season and can develop rust spots that score the cylinder walls when the engine starts up in spring. The process differs slightly depending on engine type. For conventional four-stroke and carbureted two-stroke engines, remove the spark plugs and spray fogging oil directly into each cylinder, following the instructions on the can. Replace the plugs, applying a thin coat of anti-seize compound to the threads before installing. If the spark plugs are approaching the end of their service interval, replace them now rather than in spring.
Step 6: Lubricate Grease Points and Protect Exposed Metal
The outboard has several grease fittings that should be addressed every season. Steering pivot points, the tilt tube, throttle, and shift cable ends, and the propeller shaft all benefit from fresh marine grease applied through a grease gun. This prevents the kind of corrosion-caused seizing that makes routine maintenance much harder the following year. After greasing, spray a corrosion inhibitor across all exposed metal surfaces on the powerhead and lower unit. Remove the propeller and inspect it for nicks, dings, and fishing line wrapped around the shaft. Line around the prop shaft is one of the more common causes of seal damage. Clean the shaft, grease it, and set the propeller aside for spring.
Step 7: Check the Water Pump Impeller
The water pump impeller is a rubber wheel inside the lower unit that circulates cooling water through the engine. Impeller vanes develop compression set over a long static storage period, becoming less flexible and less effective at moving water when the engine starts up again. For engines running in BC’s mix of river silt, saltwater, and freshwater conditions, annual inspection is a reasonable practice. Saltwater accelerates rubber compound degradation, and engines that operate in the shallow sediment-filled sections of the Fraser River wear impellers faster than engines running on clear coastal water. The standard manufacturer guideline is replacement every two seasons or every 100 to 200 hours, depending on the brand, with annual inspection in between. If the vanes show any cracking, brittleness, or reduced height compared to a new impeller, replace it now.
Step 8: Battery Disconnection and Storage
A boat battery left partially discharged through winter suffers from a process called sulfation, where lead sulfate crystals form on the battery plates and permanently reduce capacity. Disconnect the negative terminal first, then the positive. Inspect the terminals for corrosion and clean them with a wire brush if needed. Charge the battery to full capacity and store it in a cool, dry indoor location away from freezing temperatures. A fully charged lead-acid battery will not freeze until approximately minus 70 degrees Celsius. A battery at partial charge can freeze at much milder temperatures. Using a smart battery maintainer set to float charge mode throughout winter extends battery life significantly and ensures a strong start in spring.
Two-Stroke vs Four-Stroke: Key Differences
The steps above cover both engine types, but the differences between two-stroke and four-stroke winterization are worth seeing clearly in one place.
| STEP | TWO-STROKE | FOUR-STROKE |
| Engine Oil Change | Not required. Two-stroke engines mix oil with fuel rather than using a separate crankcase. | Required every season or 100 hours, whichever comes first. Old oil contains acids that etch bearing surfaces during storage. |
| Fogging Oil Application | Spray into the air intake while the engine idles, or follow the DFI-specific procedure if applicable (OptiMax uses DFI oil in the cylinders, not fogging oil). | Remove spark plugs and spray fogging oil directly into each cylinder. Replace plugs after fogging. |
| Fuel System | Stabilize and run for 10 to 15 minutes. For carbureted two-strokes, shut the fuel off and run until the engine stalls to empty the carb bowls. | Stabilize and run for 10 to 15 minutes. Fuel-injected four-strokes do not require running to stall. |
| Lower Unit Gear Lube | Change every season or 100 hours. Same process as a four-stroke. | Change every season or 100 hours. |
| Self-Winterizing System | Some newer E-TEC two-strokes fog themselves when the key is turned off after the last run. Fuel stabilization and gear lube change are still required manually. | Not applicable. Full manual winterization is required. |
When to Do It and When to Call a Technician
The right time to winterize is when you know the boat will not go in the water again for 30 days or more, ideally before the first serious cold snap of the season. In the Fraser Valley and Greater Vancouver, that window typically runs from mid-October through November. Waiting until late October means competing for service department bookings with every other owner who had the same idea. Our service team starts filling the October and November schedule in September, and the owners who book early are the ones who get the date they actually want.
If you are comfortable with basic maintenance, you can work through the steps above with simple tools and a few hours on a weekend, but if your engine is newer, still under warranty, or something does not look right, it is better to have it checked before storage. Milky gear lube, a weak tell-tale stream, or anything unusual during fogging can all point to a problem that should not wait until spring. Our Mercury-certified technicians and Yamaha-certified service team handle full outboard winterization and can check for anything else that needs attention before your boat sits for the winter.
What to Do When Spring Arrives
A properly winterized outboard should be fairly simple to bring back in the spring. We start by reinstalling the propeller, reconnecting a fully charged battery, and checking the spark plugs for condition and proper gap. Before the first launch, the engine should be run on muffs to make sure the tell-tale has a strong, steady stream. That is the easiest way to confirm that the water pump and cooling system are moving water properly. It is also worth checking the gear lube for any sign of water contamination that may have developed while the motor was sitting. If everything looks clean and the engine runs normally, the boat should be ready for another season.
If the engine is getting older, spring is also a good time to be honest about whether another service cycle still makes sense. In many cases, regular service is all the motor needs. If the same issues keep coming back, or the engine is no longer reliable for the way you use the boat, a repower may be worth discussing. At River City Marine, we can help you look at the practical side of both options, whether that means servicing the current motor or deciding if new power is the better long-term move.